Sunday, December 4, 2022

Getting started with Airbrushing


Over the past few years, I seem to run into the same conversation with friends as well as on various online forums.  Usually someone wants to get started with Airbrushing their models and has no real idea where to start.  Having invested a lot of time and money into answering that same question for myself, I try to avoid the default “google it” or “check on YouTube.”  No offense to those options, but much like the options available related to the subject, there are as many answers available and many seem (to me) to not quite fit.  As a result, I thought it might be worthwhile to write about my experiences and what I tell people when asked that question.

First, some background on me.  I started painting models in the early 90’s with an old Hero Quest box set and some Testors Enamel paints.  Moved on to Battletech plastics, and later to 40k in the 2000’s.  I am by no stretch of the imagination what could be considered a ‘pro’ at this.  I have at least a dozen miniatures painting projects on my workbench at any given point, in a mostly uncompleted condition.  I think in 20 years of painting miniature figures, I have completed maybe a dozen ‘single model’ projects, and perhaps a single ‘full’ army for a game.  What I would consider myself well versed in is learning time saving and efficiency methods so I can continue to add more projects to my workbench and feel as though I am making progress on them.

My start in Airbrushing was 2004 (?) with a cheap ‘airbrush kit’ from Harbor Freight Tools.  I think it was a single action siphon feed airbrush, with a compressor that was supposed to be used to fill basketballs (or maybe bike tires).  Results were middling at best.  Several years later I came across an individual selling a large collection of airbrushes (from brands I recognized) along with a compressor and paints.  He had purchased them to do body-painting and gave the endeavor up, taking the hit in cost because he just wanted rid of them.  At that point I got seriously involved in it.  Four airbrushes of a variety of makes/models (most of which were broken), an iwata compressor (for miniatures, but without an air tank), and a mix of paints (which were totally unsuited for miniatures). 

Since then, I have learned a lot about what works for me, how to clean/repair/maintain brushes, and I have had the opportunity to learn from some very experienced people to develop my own set up.  My actual painting ability is still rudimentary (I have had way more time invested in the cleaning/repair process than I have actually painting with it), I think I have enough experience to at least help someone along to getting started with their own kit. 

Before digging in, it may be worth your time to familiarize yourself some basic airbrush concepts.  Iwata (a notable brand) has a good guide, located here:  https://www.iwata-airbrush.com/airbrush-basics.html

The scope of this article is to relate my recommendations for those new to the hobby, based on my own trial and error, in order to make an informed decision before jumping in.  I will break it down into a few broad categories, with explanations along the way.  As with anything like this, there is no ‘right’ answer (though you can frequently find several ‘wrong’ answers).  I am sure others can and will produce the same results as me (if not better) with different equipment.  This is just an explanation of what I recommend to people and why, with a lot of the little options I have found along the way.  All of this assumes you will be using the brush to paint hobby models in a scale from 15mm to 28mm (the scales I play). 


Part 1 - Minimum Requirements

The three things you need to airbrush, at the very minimum, is a brush, a compressor (or source of pressurized air), and paint.  Everything else falls into ‘consumables’ to ‘nice to have’ or ‘quality of life’ improvements.  With those three items, you will be able to put paint onto models, which is the point. 

Airbrush:

I have used hobby airbrushes from a variety of manufacturers with a variety of designs.  Iwata, Badger, Paasche, Aztek, Masters, even that cheap Harbor Freight model I started with (basically the equivalent to the no-name $20 version you can get just about anywhere).  Single action, dual action, siphon feed, gravity feed, quick change nozzles, bare bones or all the bells and whistles.  The style I continue to use and recommend is a gravity feed, double action brush.  I recommend Iwata (my preferred brand), though Badger is popular.  Like with a traditional brush, your choice in airbrush should reflect what you plan to do with it.  I currently maintain two Iwata brushes, listed below.

Iwata Revolution HP-CR (Retail $125, Amazon $100) -
https://www.iwata-airbrush.com/revolution-4500-cr.html
https://www.amazon.com/gp/product/B000BQS3UW

Iwata Revolution HP-BR (Retail $122, Amazon $95) -
https://www.iwata-airbrush.com/revolution-br.html
https://www.amazon.com/gp/product/B000MH6Q5E


The CR is a gravity feed, dual action, with a larger paint reservoir (with an optional lid, I’ve never used mine).  It has a .5mm nozzle size, though it can be converted to .3mm.  This is my work horse brush, used to prime and base coat almost all my models.  It is a simple design, with a minimum of parts that can be adjusted or damaged compared to some others.  It is capable of some detail work, depending on the scale, and I have used it to good effect in applying camouflage on 15mm WW2 models.  If I had to choose a single brush to keep and use, this would be it.  Easy to clean, easy to maintain, good coverage, large reservoir, great coverage for the scale of models I paint. 

Due to the limitations of the .5mm nozzle on the CR, I purchased the BR for more fine camo work at 15mm.  Specifically, the ‘squiggle’ camo patterns for German armored vehicles.  If you need to paint a very small area with limited overspray and more fine control, the BR is a good choice.  It is virtually identical to the CR with a smaller reservoir and a .3mm nozzle.  When faced with the decision between buying a whole new brush for detail work or buying the conversion kit for the CR (and the time/effort in swapping the nozzle and needle) it made more sense to just get the second brush. 

Badger would be my backup recommendation.  I have used several over the years, but I have the most experience with the Patriot 105 and SOTAR 20/20.

Badger Patriot 105 (Amazon $126) -
http://www.badgerairbrush.com/Patriot_105.asp
https://www.amazon.com/Badger-Air-Brush-Co-Patriot-Airbrush/dp/B002W84GTO

Badger SOTAR 20/20 (Amazon $135) -
http://www.badgerairbrush.com/Sotar_20-20.asp
https://www.amazon.com/Badger-Air-Brush-Co-2020-2F-Airbrush/dp/B000BROVIO


I found the badger brushes to be easy to use, but not as easy as Iwata.  There are more options with regards to nozzle swaps, fine adjustments for spray (especially on the SOTAR), and the nozzle tip is easy to bump/damage due to it extruding from the brush without a cover (like the Iwata has).  I actually bent the nozzle/needle on my Patriot early on from regular handling.  This was completely user error, I was not paying attention to where I was holding it and it brushed up against a hard surface, but worth mentioning.  An advantage Patriot has is that parts are inexpensive.  A disadvantage is that I needed a lot of them.  I also bought the extra nozzle/needle sets for the SOTAR, giving it a much wider range of uses.  I include them here for options, some people feel strongly about a particular brand. 

NOTE – Badger will frequently run sales direct from their store, which cut the price down for the available brushes significantly.  I purchased my badger brushes with a sale like this, and if you want to get any of their brushes, I would HIGHLY recommend you wait for one of these sales.  They are good brushes, I just feel the Iwata brushes do the job I need them to do better and for less cost.


Compressor:

The second item you will need is a way to get compressed air into the brush.  An air compressor is the most common method that I have seen.  It is worth noting I have seen people use individual cans of compressed air, some of which were refillable from a regular (non-hobby) air compressor.  I have also seen battery powered hand-held compressors.  Personally, I think those are niche uses.  For most of us, you will want a hobby compressor.

Buy a compressor with an air tank.  My first compressor was just that, with no storage tank for the air.  It ran constantly, had difficulty maintaining pressure, and overheated (the heated air had a serious impact on the paint job).  Other than that, buying a ‘name brand’ is optional.  I have had very good results from this model:

Quiet 1/5 hp Airbrush Tank Compressor -
https://www.amazon.com/gp/product/B001738DXU

That model is currently unavailable, though I have had friends recommend this similar item:

Master Airbrush 1/5 HP Cool Runner -
https://www.amazon.com/dp/B07ZQM6R83

The important thing to look for is an air storage tank and a moisture trap (that clear plastic thing attached to it, traps the moisture coming out of the tank – very important for humid regions).  I have found that one models works about as well as any others.  My compressor is going on 4 years of regular use, and the only issue is that one of the rivets on the carry handle came loose and needs to be reattached.  Performance-wise, it is great.  Not too loud, no issues with heated air or moisture, and keeps steady pressure (I paint at 20-22 psi).

There are name-brand options which I am sure will do the job, but at a significantly higher cost.  Avoid micro-compressors like those designed for airbrushing nails or ‘salon’ compressors.  They usually operate at a lower psi and tend to lack an air tank (so they overheat).  You can use a ‘generic’ garage compressor, like you would use to fill tires or basketballs and such, but I would highly recommend against it.  I started with one myself but could not get the pressure consistent (they tend to operate at a much higher psi than hobby airbrushes), lack moisture traps, and a fluctuation of pressure at the wrong time could result in a bad paint job or a damage airbrush. 

NOTE – You will need an air hose and possibly an adaptor to hook your airbrush up to the compressor.  Look for a compressor that has a braided hose (much more durable) and fits your airbrush.  My badger brushes require an adaptor as all my hoses are for Iwata’s.  I consider this an included expense with the compressor as many come with it but check to be sure. 


Paint:

Use whatever you like, just thin it down. 

Seriously, it is that easy.  My go-to is Vallejo, though I use Army Painter, Citadel, AK Interactive, P3, and a variety of others.  I have heard of success stories with Apple Barrel craft paints (my first airbrush paint job used that, actually).  While I would recommend you go with a known hobby paint brand, any acrylic paint should work.  The cheaper ‘craft paint’ just tends to have issues with pigment (the pigment particles are larger in some cases, which after thinning can produce a grainy finish, but not always).  You do not need to go out and buy new paint. 

Several companies are producing ‘airbrush ready’ paints now, which match up with their standard paint.  That works, though it usually still needs to be thinned down.  The necessary items to properly thin paints will be in the consumables section. 

With regards to how much you should thin your paint, I have always been told to make it the consistency of milk.  No, I still do not know exactly what that means.  I gauge it based on results.  If it sprays properly and gets good coverage without being runny, its good to go.  If it sputters, I thin it more.  If it comes off runny and transparent, I add more paint.  In this case, I will refer you to YouTube and leave it to that.  There is a lot of trial and error involved until you get a feel for it.  If there is interest, I will work on getting a list of videos I have found helpful together and post that playlist for others.

NOTE – I will recommend Badger Stynylrez primer over any others.  Vallejo primers can go on a little thick/rubbery and have had curing issues.  AK primers are a mixed lot.  I have had nothing but consistent good results from Stynylrez primers (check amazon).  Actual paints can be standard thinned down or made for airbrush.  For gloss or matte finish, you will want to get one designed for airbrushing, my attempts at thinning down brush on clear coats have not produced good results. 


There you have it, the three items you need to get into airbrushing.  All told, you can expect to spend $200-275 on your brush and compressor.  Less if you can find sales.  If you are trying to save money, cut corners on the compressor (as long as it has an airtank and moisture trap, you are good), not the brush.  If you are only trying to airbrush primer and maybe the base coat, you can go cheap on the brush, just recognize that to get finer detail later on (which you eventually want to expand your experience with it, like we all do) odds are good you will be buying a new brush.  Spend a little extra up front and get a good product with a variety of uses.  Now, lets move on to the other items.


Part 2 - Consumables

To save time/space, I am going to attempt to be brief.  These are all items you either have to have (marked with a *) or are really helpful to have around, and you will be buying them several times.

* Airbrush Cleaner – Iwata-Medea Airbrush Cleaner – I buy the large bottle (32oz) and refill the small squirt bottle (4-16oz)

* Airbrush Thinner – Vallejo – Get the big bottle, you’ll use it

Airbrush Flow Improver – Vallejo – A small bottle will work, it’s a compliment to the thinner

Gloves – Dealmed Medical Exam Gloves/Nitrile (Black) – I prefer the black gloves, but anything will do.  Wear them on the hand holding the model so you don’t get paint all over yourself.

Q-Tips – For cleaning

Alcohol – For cleaning

Distilled Water – For cleaning

Toothpicks – For mixing paint

Dropper bottle for Alcohol/Water

Acetone/Mineral Spirits – The ‘nuclear option’ for cleaning, use sparingly

Shop Towels – I prefer the thicker blue shop towels, but any paper towels will work.  Both for cleaning up as well as test spray


Quality of Life Improvements

Here are a variety of items I have added to my airbrush set-up with a brief explanation of how I use them:
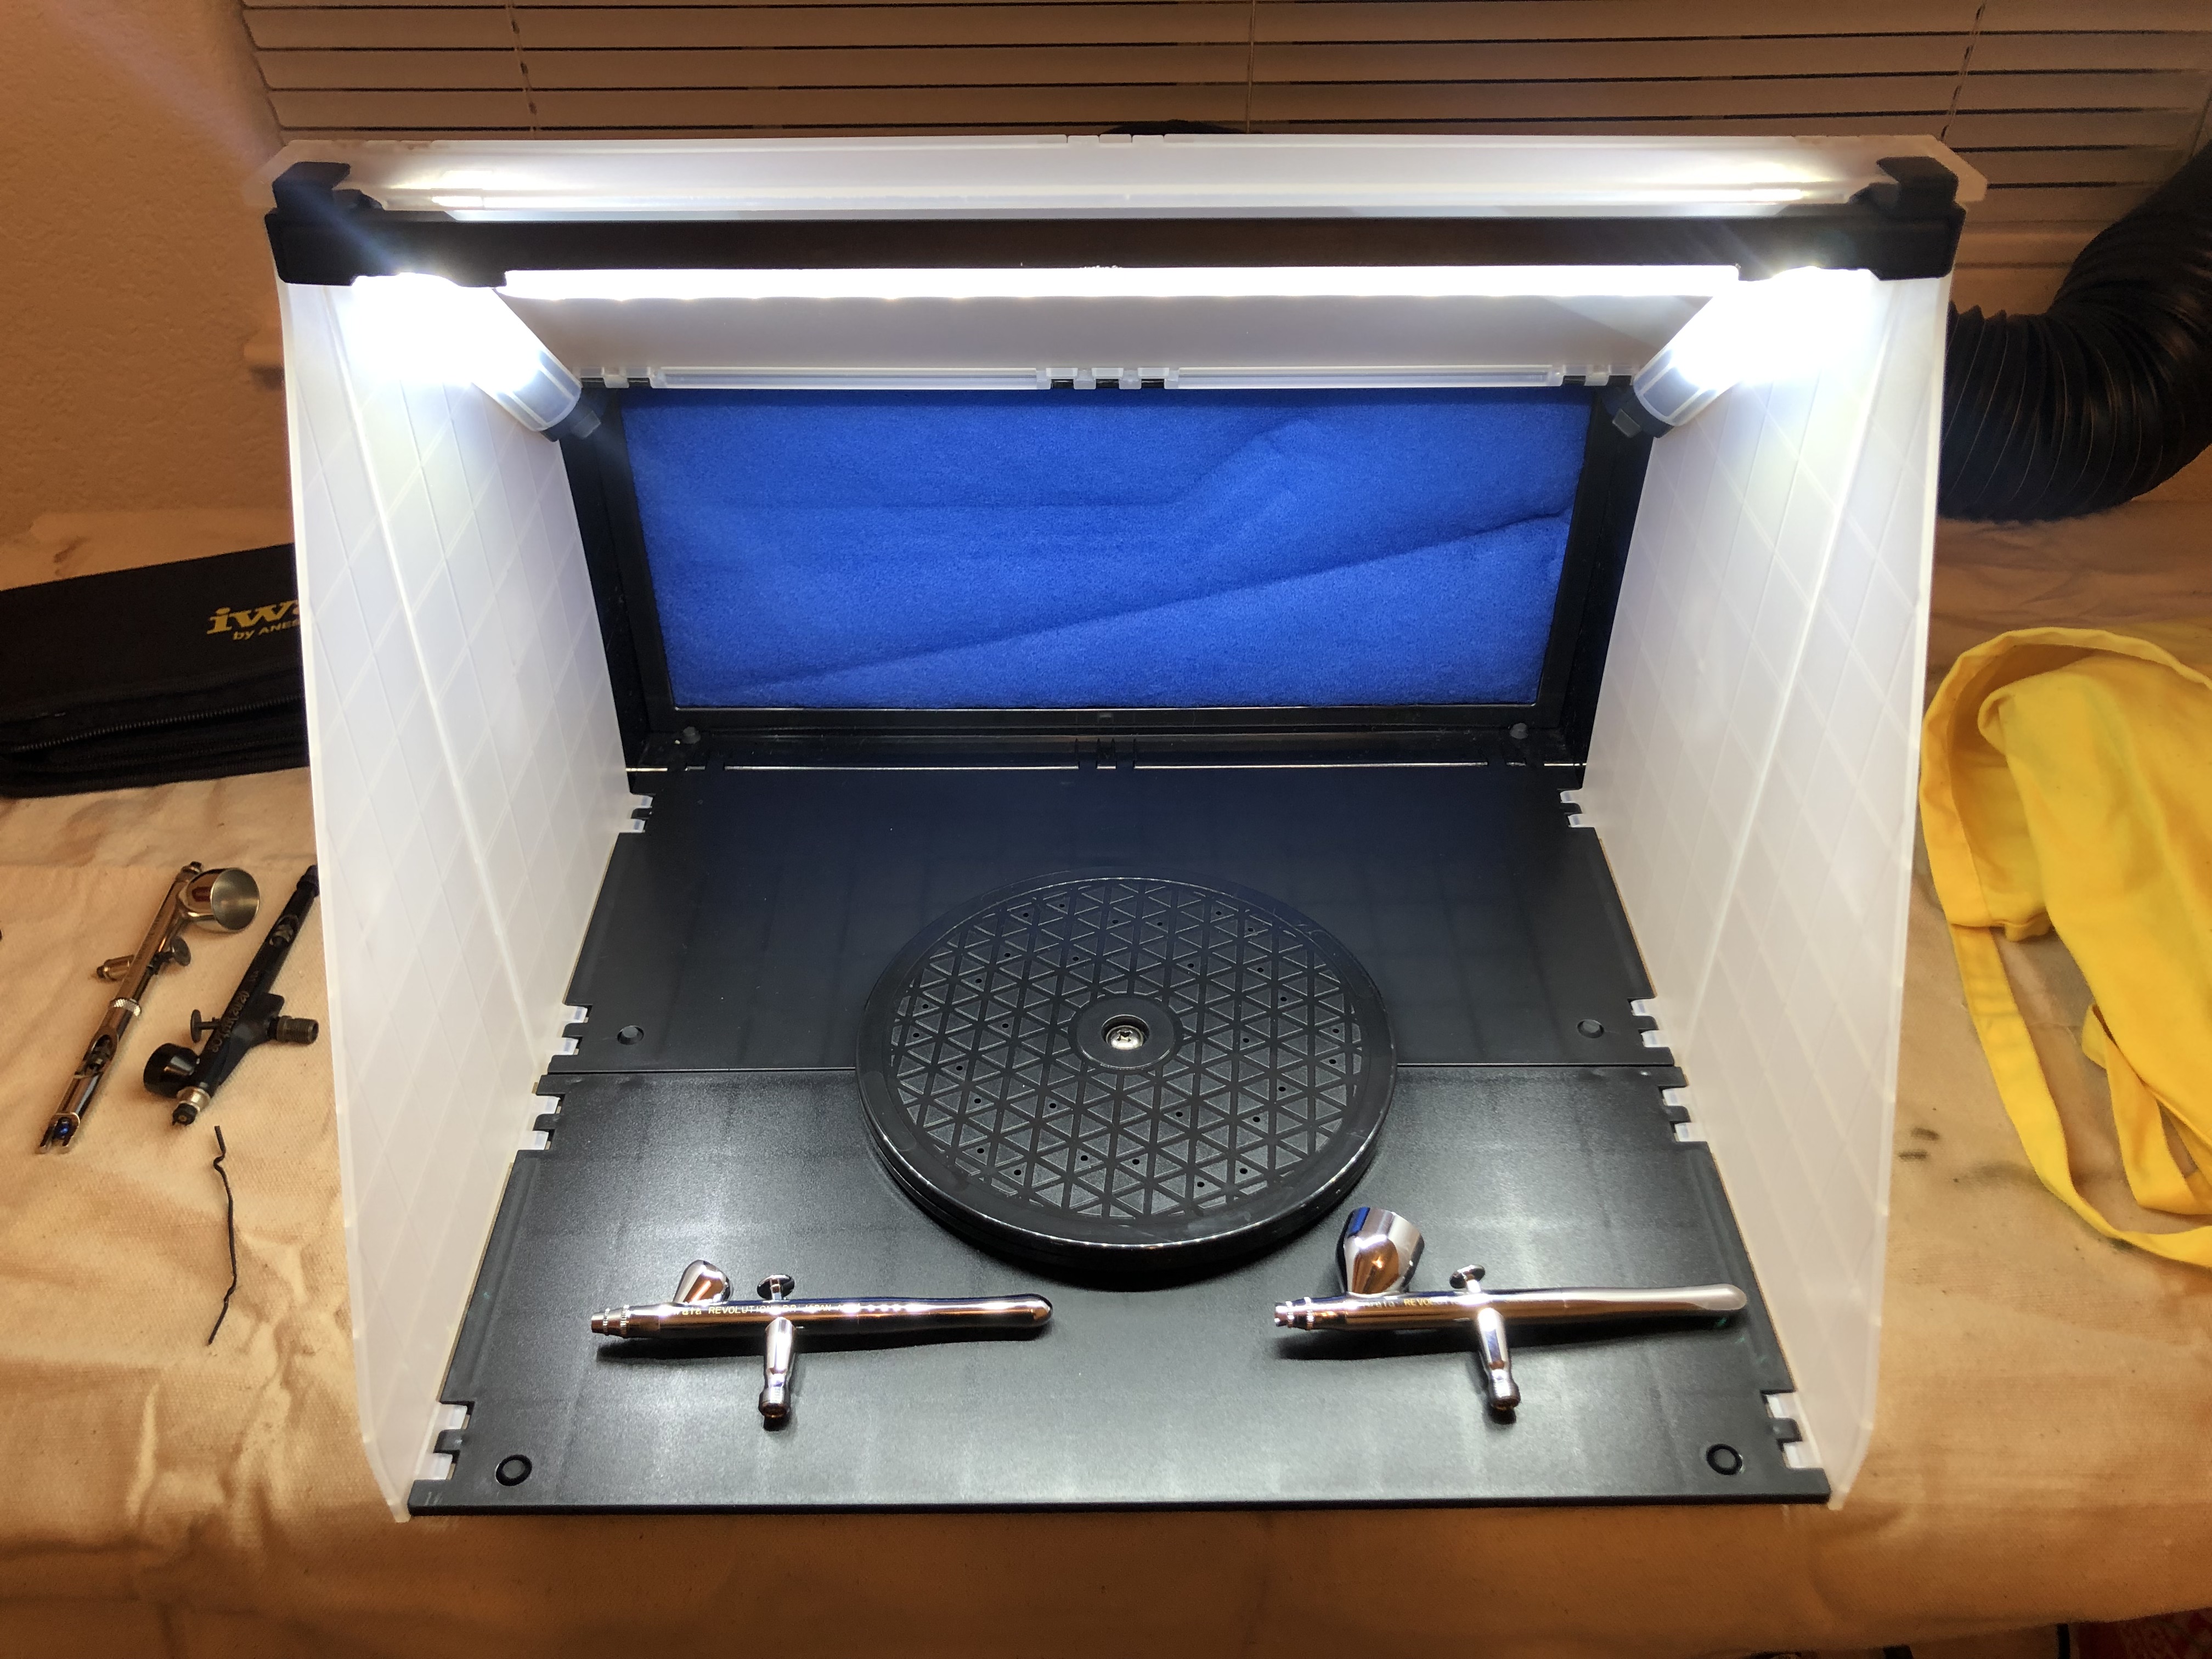
Airbrush Booth/Vent - https://www.amazon.com/gp/product/B00NLQ019A - This is a dual-purpose spray area with a vent (and lights if you get the version that has them).  Important for indoor airbrushing or areas with limited ventilation. 

Canvas Drop Cloth – Harbor Freight – Something to protect my table, as well as one to put under my whole painting station for spills.  Just saves me scrubbing things later to remove spilled paint.

“Dump Bucket” – Any hardware store – Standard 5-gallon bucket or small mopping bucket.  Easier to dump waste paint/cleaner/water into this while working than getting up and going to the sink.  I’ll put a little water in initially so nothing dries in it, then as I change paints, clean the reservoir, etc, I just dump into the bucket.  Dispose appropriately at the end of the painting session.

Airbrush Cleaning Kit – These usually have both a ‘spray pot’ (where you stick the nozzle of the airbrush into it and spray to clean it out without spraying paint everywhere) and a brush set (pipe cleaners).  Some have pick sets as well.  Just good to have for those hard to reach clogs. 

Brush Holder – Something that will clamp on to your table where you can rest your airbrush in an upright position (in case there is paint inside it).  Spray pot will work just as well. 

Apron – Keeps spills off your clothes.

Tool Box – If you are planning on transporting your kit, find a big enough tool box to hold everything.  I have a rolling tool box that has my compressor, brushes, tools, paints, everything. 

Golf-Tees/Blue-tack – How I hold my models while painting.

Ultrasonic Jewelry Cleaner – Useful when you need to do a deep-clean after a few painting sessions.  I’ll do a general cleaning after I am done for the day, but after a few sessions things will build up.  Strip the brush down to its component parts, soak it, get into it with the picks and q-tips, then let it spend some time in the ultrasonic cleaner.  Reassemble, lubricate, and should be good to go.

Soaking Glass – I have a small somaek (Korean mixed drink, Soju and beer) glass that fits my airbrush perfectly.  I’ll fill it up so that the cleaner covers the reservoir (but not the trigger) to soak if I am taking an extended break.  “Professional” opinions are mixed on this.  Some say never to soak your airbrush, others highly recommend it.  I’ve found it helps with cleaning and keeps paint from drying if you take a break. 

Long bristle synthetic brush – I use this both for mixing paint in the reservoir as well as cleaning out anything deep in there when I’m changing paints.  Synthetic brushes hold up better and are stiffer.  LONG bristle, you want to be able to get into the recesses.  Preferably with a plastic handle so it doesn’t crack when you leave it in the soaking glass. 

Various Tools – Tweezers, nozzle removal tools, picks, etc.  There is not a painting session that goes by where I don’t wish I had something on hand, then forget to add it to the collection when I’m done.  You’ll find a variety of odds and ends that would have come in handy, just remember to have them available (and accessible with one hand).

Quick Change Valves – I was using 4 airbrushes at one point, so I tried the quick-change values to switch between them without loosing all my air pressure.  They never worked quite right. 


For most of these items, a quick search on amazon or a trip to the local craft store should get you what you need.  I’ve included photos of my setup for reference as well.  If anyone has questions or I missed anything, please let me know.  This is likely to be a work-in-progress as I find new items or new ways of doing things.  I just hope my mistakes can help save others the same cost and trouble.

Here are some photos of my set-up:


My travel box - Assembled, packed up, and the full contents


My tool box


Painting area all ready to go


My painting booth
(I used poser board and tape to line the inside, as this is going to be set up for a longer period, which will save me from having to clean off the inside walls later on - If you are not planning to relocate, this is a big time saving step)


Monday, September 30, 2019

Northern WiP thoughts

The weekend started off with an attempt to live-stream my painting at the request of a few who wanted to see how the contrast paints work.  Spent an hour getting things set up with the webcam, the right angle, lighting, etc.  In the end though, it was kind of a wash, as my camera was having issues getting the model I was working on in focus.  Tried it on Facebook rather than twitch, so the rest of the weekend was spent looking up ways to adjust the camera settings in OBS (my streaming software) to possibly allow for recording that way. 

End result?  Very little painting done, but a better understanding of what I would need if I was going to do how-to videos.  Next up, I'll try using my old iPad mini to film, then voice-over the painting footage.  Its not ideal, but the camera is still pretty good for being as old as it is.  A few extra steps, but without an actual camera (rather than a webcam) I think I'm going to have to stick to streaming gaming rather than projects for the moment. 


With all this going on, I did manage to get a bit of work done on my northern army.  I have everything base coated with the contrast paint except for a few paratroopers I am saving for when I can get a camera set up to record it.  After the failed stream, I went and decided to knock out all the models on my desk, only to realize at the end I hadnt gotten the footage needed.  So those will be sitting here until I can try it again this week. 


On the left, you have the WiP of the Stripped Down Hunter.  Militarium Green contrast paint for the ballistic cloth on the arms/legs.  It looks good enough in a photo, but doesnt look quite right in person.  The recesses are dark, gives the green look I wanted, but the flat areas of padding are splotchy and not the right shade for me.  So then you have the model on the right, where I took a 'faded OD green' (Mekong Moss from the Heavy Gear paint set) and wet brushed the raised areas.  Much better.  Gives the faded look while also showing off the texture.  Adds more to the process, but gets the right look.  I am still not sure if I should possibly undercoat the cloth areas with a regular green prior to the contrast paint, but in the interest of getting these done with the fewest steps possible, I think they should be fine without it.  Opinions?


This test was a flop.  I wanted to see how the Blood Angel red contrast paint would look on the head of my airborne troops.  I was going for more of a maroon, ended up with a bright red.  I think I am going to need to re-paint the heads using a dark grey if I want to use the contrast paint, or simply paint them the color I'm going for.  Below is a photo of the Asp I painted with a red shoulder, which was a grey base, and it has more of the muted red look I'm after. 


I'll try another one with regular paint before I go and re-do all the heads with a darker base color.  The red shoulders might look darker because of the overall tone of the model, rather than actually being darker.  Still, its progress. 


Thursday, September 19, 2019

Southern Paint Experiment and Future Projects

The testing continues!  So far my experiments with the contrast paints have worked out well.  I started with the squad of Asp's as the test run, but given how well they came out I went ahead and did the entire force like that.  I'll post the complete color list and step-by-step on my next post, once I have finished models to show off.

Once I had the entire force base-coated, I tried a few different colors with my two Gila's (Duelists).  One in purple, which turned out too dark with the grey primer (and later turned out to still be too dark even on a white base, I think it might work if thinned down, but did not try that).  The other in green, which I liked.  That green is a runner up for choice with the army, but grey just felt more appropriate for a Southern group.  


I did the Asp's with red shoulders, then considered a different color for each group.  Started to go back and forth with it, thinking about doing the whole force with red shoulders instead, so I asked for advice.  After explaining to my wife the dilemma (for what is basically a 'platoon' or 'company' sized element, they really should all have the same markings), her response was perfect.  "Yes, I know that's not how the military works.. but this is space robots... sooo..."  She was right, as it turns out. 


Each squad got its own shoulder color, chosen from the colors that I thought would stand out.  Tactical?  No, not at all.  But its "space robots" so I can let that go.  The only squad that did not use contrast paints for the shoulder was the command squad, which had issues with the purple contrast paint being a bit too dark.  I went with a regular paint (non-contrast) purple instead.  

Testing details.  Red for the optics (green was considered, especially as the missile pods are also red, but growing up with movies like 'The Terminator' robots have red eyes.. it just didnt feel right otherwise), yellow bands around the missile pods for the warning stripes, etc.  I painted a few weapons in a full metallic grey and another set in black.  The black looked better, so repainted the metallic ones.  I'll probably hit details in gunmetal and drybrush it.

Final bit of testing was the base.  I picked up a few big tubes of non-hobby paint on sale at a craft store a month or two ago for basing/terrain use.  Painted the sandy/rocky area with a burnt umber, then the squares like concrete slabs.  A wash of Agrax Earthshade tied it all together and gave it the weathered/dirty look I wanted.  Might hit the sand with a light drybrush before looking for appropriate desert foliage tufts to stick on a few of them.  

For me, one of the most time consuming parts of painting a force is figuring out what to paint which color.  There are still little details I keep having to go back to get as I realize I missed them (the road wheels in the feet/legs, pouches/knives on the waist, grenades, accessories, etc).  I take a lot of notes with what I try, what I decided to go with, and the order I paint them in.  Then, when I take another year or so off from painting somethings (or need to go back and make a new squad that looks the same) I have the hard part taken care of.  It also helps when people ask how I did them.  

This is really exciting for me.  As I've mentioned, I have been painting and playing with miniatures in one form or another since the mid-90's.  I do not think I have ever been this close to a finished army in any game I have played.  Most of the hard part is done, and trying to stick to a commitment of spending at least 30 minutes a day doing something hobby related has really gotten some solid work done.  

Next up will be my Northern army, which I have also done some testing with.  Ideas are abound there, mostly in how I can improve the technique.  For the contrast paint I am using as the 'base coat' I think I will try to thin it down some, maybe avoid those brown 'spots' I got when it was left to dry while too thick.  The green on the ballistic padding (a feature on any stripped down or paratrooper gear) did not turn out well either, so I may paint those with a different green as the base, then wash with either a contrast paint or something else.  The fiddly bits will be much the same as the south.  Eyes, weapons, accessories, they can all match the southern models.  

Long-term is a plastic Caprice army from the kickstarter.  As of now, I think I have 4-5 models assembled, the rest are still on sprues and in a box.  Once both the other two are done, I'll see if I have the drive to push on to a third army.  Good news is I already have quite a bit figured out with them with regards to painting.  I intend to do them up in a red shade (probably the Blood Angel Red contrast) and the basing will be a red-oxide colored paste that should simulate Caprice well enough (it has a very 'Mars' look to it).  My big hang-up with that army is magnets.  I have several good guides to work from with how to magnetize the army, its just finding the appropriate magnets I am finding difficulty with.  I'll keep looking while I get these two done.  

I have a game coming up this weekend with a completely new player, so I'm going to try and get as much done as I can before then.  I'll keep things updated here as best I can.

Tuesday, August 20, 2019

Testing Contrast Paints (Heavy Gear)

I took a few hours and tried out a northern and southern paint scheme last weekend.  As I have two fairly large armies for Heavy Gear, I wanted to do something that would let me get a decent paint job on them without committing to time that I just dont have to spend on them.  First, the armies.

Southern Army (ESE)

Northern Army (WFPA)
As you can see, there is a lot there.  Not bad for starting sometime in 2013.  Managed to get an army assembled and primed in less than a decade. Now for the real test, can I get them painted before 2020?

To start with, there is a color 'theme' with factions in HG.  The north tends to go for lighter earth-tones (yellows, browns, etc) while the South tends to go with darker colors (grey, green, etc).  While I have yet to find a resource in any of the old books I own, sometimes things like this just happen.  Like painting WW2 Germans as a grey rather than grey-green.  I digress.

Citadel recently came out with a line of Contrast Paints.  I wont bother linking to a video or review, just do a search, you'll find a ton.  My review came from a local game store, and the results were pretty good for the work put in.  The idea is that it is a one-layer paint/wash all in one.  It pools in the lower areas, giving it a lighter look on raised area and darker in the recesses.  My main concern was coverage, and how it would look on wide flat areas.  First attempt at using them was to paint some British Vospers for Cruel Seas that I did not plan to use.  Lets have a look.


As you can see, I also painted a few of my Italian ships after I tried them, except with a white primer.  The color of the primer can make a big difference in the final look of it, because of how transparent the contrast paints are.  If you look at the bottom, I used (from left to right) Basilicanum Grey, Creed camo, and Militarum Green (not counting the three that were left in the grey primer).  I also used the Basilicanum Grey on the Italians, but with the white primer they came out with a much lighter grey than the dark look (almost like a black wash) on the grey primer.  Good enough for now.

Once the army was primed, I picked a sacrificial unit from each as my color test unit.  Something that could look different from the others if I didnt like it, and it would make sense.  Asp's for the South, Stripped-Down Hunters for the North.  Here is the test run.


Top photo is the primer with the contrast paint test on the Asp, below that is a Stripped-Down Hunter and some infantry.  Once I got going on the contrast paints, I didnt really want to stop.  The infantry used Skeleton Horde for the body and Aggaros Dunes for the helmet.  For some reason, even though it is the same primer the Aggaros Dunes turned out much brighter on the Gear than on the helmets.  Maybe it was the surface area, or I used too much.  Still, I wanted to tie the two units together with a similar color.  I also find it very interesting that the resulting color does not really match the color shades shown on the various charts for the contrast paints.  My advice there is to buy what looks right in the bottle, and try it out.  You can also use helpful references like this: https://imgur.com/gallery/GjwQxcy

For the Asp, I did the main body with Basilicanum Grey, one shoulder in Blood Angels Red, and the weapons (gun and grenade packs on shoulders) with Black Templar.  The Hunter got Aggaros Dunes, with Militarum Green for the ballistic cloth.  I started to use Black Templar on the rifle, but the primer was too bright so I opted to just go back over with an actual black paint later on.  Here are the finish squads.


Some things to pay attention to.  You'll notice one Hunter has really brown shoulders.  That was accidental, when I went over a mostly dry section that had been painted once already with another layer.  Radically changed the color.  In this case, it works out.  That will be my Group Leader (CGL), but it is something to pay attention to.  There is a little play with the colors when they first go on, but if you try to touch it up later with spots you miss, you'll end up changing the color of anything that has dried.  I first noticed this with the Italian ships above, and it is a race to cover everything with a single layer before it starts to dry, without accidentally doubling up on coverage.  This is going to make larger models (like ships) a challenge. 

The other thing I noticed is that the Militarum Green on the ballistic cloth seemed to be very light on the raised areas.  Almost too light, with the tan showing through.  I went back over with a second layer there, which didnt drastically altar the overall color, but made the dark recesses very dark.  I'm not sure if I should maybe paint a layer of a green roughly over the areas on future models, then add the contrast paint.  Its worth some testing. 

All in all, I am happy with the results.  Minus a few details (guns, sensors, exhaust and other weathering) the Asps are done, which took me about an hour overall.  The hunters took a little more time, because I had to use two colors on specific areas, as well as having to be very careful with coverage. 

For those of us who want to try and save time whenever possible, I think the Contrast Paint line will certainly help.  I wont get into the debate over DIY contrast paints vs the Citadel versions and all that.  Thats something else you can dig up if you want to get into it.  I will say that once I have a stable studio, I may look into making a contrast paint base in a large quantity, then using inks to make my own, but thats way down the line.  For now, this works.  It isnt a one-stop painting solution, but it did save me quite a bit of time.  Some thought has to be put into it by using the right color primer to get the final result you want, but it did save me time in the wash/highlight step.  The result isnt perfect, but certainly good enough for table-ready models.  I'll be sure to post up photos of the finished squads so you can make up your mind there.


Saturday, August 3, 2019

Model Prep and Build Process

I am occasionally asked what my process is for getting my models put together and ready to use.  Here, I am going to explain what works for me and give an overview of the process.

Before I get going, I want to do a review of the tools I use.  It is not necessary to have all of this, you can do almost everything necessary with a sharp hobby knife and some files.  I am always on the look out for a more efficient way to do things, which leads me to try a variety of products.  I've also found specific tools help with the odd unexpected situation, so I leave them in my case should I need them again.


Both of my cases were purchased on amazon, some sort of electronics storage case or other small tool case.  I travel a lot, so having them all in a portable and compact carry case made sense.  I can put them in a small box with whatever my current project is and have everything I need to work on them when I have the time.

Main Case:

  • Wire Cutters
  • Flathead pliers ( square tip - no teeth)
  • Pointed tip sprue cutters
  • Steel needle files
  • Emery Board (for sanding fingernails)
  • Citadel Moldline Remover
  • Tamiya paint stirrer
  • Variety of Hobby Tweezers
  • Padded grip hobby knife (with cover)
  • Tamiya precision pin vice and bits
  • Scrap plastic (to check pin vice bit sizes)
  • Variety of pin vices


Second Case:
  • Dremel drill bits 
  • Pinning rods (with the same size bits)
  • Small cutting board
  • Extra hobby knife blades
  • Old wire cutters/sprue trimmers
  • Second Hobby Knife
  • Hobby saw
  • Second Tamiya paint stirrer
Most of this case is 'left over' stuff, or extras.  I take my cutters and put them in this case when they start wearing out and I buy new ones.  Sometimes, you have to use them to cut through some thick models or other things that would damage/dull a new set.  Better to break a set you are no longer using or one that is already dull than replacing new.  I also have a plastic tub that is full of many more left over or old tools I no longer use that I'll occasionally dig into.  Never discard things unnecessarily, it might save you some time to use it again down the line.  Also, buy in bulk (hobby knife blades and files especially).


Now, on to the models.


To start with, you'll get your models in whatever pack they come in.  For this, I decided to go with Heavy Gear, as I have several in various stages of completion to use an example.  Just remove them from the package, try to brush off or trim any mold lines or other unnecessary bits, and get to work.

Start by removing mold lines with a hobby knife and files.  Try to trim up and identify any flaws with the model.  Get an idea of how you will be attaching it to your base, and how the parts fit together.  Pinning, if you plan to do it (based on how secure the pieces are in attaching together) can be started here.  For these models, I usually pin the arms to the torso, and another pin in the foot to attach it to the base.

When that is all done with and you have a model that is ready to be put together, you'll need to clean it up first.  This step is necessary for most (if not all) metal and resin models (NOTE - I've been told plastics need it as well, I have yet to wash my plastic models and have never had an issue - opinions vary).  It removes the various chemicals that are used in the molding process, which can cause paint to not adhere to the model.  It will also remove your finger oils, dust, and debris (like the metal flakes from filing) from your models, making it much easier to assemble and paint.

I have used a variety of products over the years.  From oven cleaner, to brake fluid, simple green, and dish soap.  I prefer Super Clean (also known as "Purple Power").  Its a multi-purpose cleaner, smells nice, wont damage plastics, and not harmful if you get it on your skin.  (NOTE - This stuff is also great at stripping paint and glue from models!)

Just throw the models in a little plastic container of the right size to submerge them, add your cleaner, and let set.  You can leave it for as long as you like, it really doesnt need much time at all (soaking not required, I just do it because I'm working on other things).  Pull them out and take an old toothbrush to them.  Get in all the little areas, rinse them off throughly with plain water, and put them somewhere to dry.  A side note - If you have hard water, try to get them as dry as possible before setting them to air dry, you'll avoid any deposits of minerals from the water on your model that way.

Following this, you will attach the model to whatever base you have decided to use.  I can do a write up on how I base my figures in another article, but that should all be done ahead of time.  As I said, I put a pin in the leg to secure to the base (I've found metal models can detach from the base if you just use glue, especially for dynamic poses).

You'll also want to put your pins into whatever parts get them.  For this Jager, you can see each arm has a pin which was small enough to be put inside the nub that goes into the torso already.  I figured doubling up on securing it was worthwhile, and did not take me much more time.  Pinning might seem like a long and unnecessary process to some, but having had several of my models not survive casual gaming or transport because the glue failed, I have a habit of putting a pin connection in just about anything.  For this model, the shoulder rocket pod and backpack could both benefit from it.  Probably not the head though, it is not nearly big enough to get a good hole in there to secure it down.  Below you can see the rest of the squad, with the extra holes in the arm slots for the pins which I added to the arms.


At this point, you can finish the model assembly and give it a layer of primer.  For these models, being metal, I used a small bottle of brush-on nail glue (the stuff for fake fingernails).  This is just a higher quality Ethyl Cyanoacrylate than the generic hobby glues you can get at any shop.  I feel like it bonds a little better, and I like the brush included in there (it helps me not make as much of a mess).  In the end, you should have something that looks like this:


There it is, from start to finish, this is how I prep and build my models.  There are a few specifics that I do not cover at all (basing, how to pin, airbrushing the primer) but those are easy to find on youtube.  This process will work for just about any model you need to put together, and can easily be stopped or started if you need to take a break.  Quite a few of the models below were started years ago, and waited in a box for me to get around to finishing them up.  No breaks, no failed joins, and having a standardized process let me know exactly where I left off. 


Questions?  Comments?  Let me know what you think and whatever else you would like to read about here.

Thursday, August 1, 2019

Summer 2019 Update

Well, the best laid plans... Spring of 2016 as my last update?  That just wont work.

Presently, I am "playing" the following games (I say "playing" because a lot of what I'm doing is often on the workbench, but the intent is there!):

  • Bolt Action
  • Heavy Gear
  • Cruel Seas
As you can see, I've paired down my list of games by a big margin.  Now, I still have everything I need to play Flames of War, Tanks, and others.  I have just found that either the current edition of the rules do not suit me, or there are no players in my area.  I mention them, because I intend to work on them, they are just a low priority compared to the three games I actively play now.  

I went through others over the past few years.  Bought Team Yankee.  Sold Team Yankee.  Bought Blood Red Skies.  Still have it... played it twice. Cleared out of all of my Force on Force/Tomorrows War stuff.  Briefly dabbled in Kill Team (40k), but handed that off to the next generation (gave it all to my son).  X-wing is sitting on a shelf, maybe off to the sale bin (again).  I even got into doing 1:800 scale warships, though that has fallen off since I got into Cruel Seas (its 1:300).  

So what next?  First, I need to look through here, see what my plans were, and compare them to what my plans currently are.  I'm anxious to get some how-to guides up.  My year in Korea was very well spent, both work and hobby related.  I learned a lot, and I want to share that.  I'm interested in figuring out a way to record hobby videos.  My current youtube channel is all my streaming (link below for those interested), but I feel that making some guides might be helpful, if only to motivate me to get working on stuff.  

I've been trying out new products.  New techniques.  Actually putting paint on models and putting models on the table to play.  Its crazy.  

I attended my first gaming convention last month.  Historicon 2019 in Lancaster, PA.  It did wonders to get me fired up again to work on these projects, as well as to share it with whoever is interested.  So here I am.  

What can you expect here?  At this time, I'm setting up a status update with my main three games.  Full photo spread of what I have, what I'm working on, and what I'd like to see happen with them.  From there, maybe a video or two.  It will be rough, but new projects always are.  I'm thinking I'll start with Heavy Gear, as there are already plenty of good videos out for Bolt Action and Cruel Seas, I'm not sure I can really add much to that at this time.  

All in all, I just need to keep up the motivation, and get these projects off my bench and onto the table!

Until then, check me out on YouTube and Twitch.  I mainly run World of Warships, but I'm trying to get set up for tutorial videos (or something similar):

YouTube - https://www.youtube.com/user/ByzantineFalcon/
Twitch - https://www.twitch.tv/byzantinefalcon/

Saturday, March 26, 2016

Spring 2016 Update

It would seem the buzz over Team Yankee has died down somewhat.  Considering I pre-ordered the rulebook from a store a few hours away in December, but it is almost four months later and I have yet to even read the rules, I will admit my own interest in waning.  I still plan to work on the models I purchased in 6mm, so hopefully actually getting the rules in my hands will get me motivated.

Though, I have to admit, I am somewhat glad it went this way.  Battlefront just announced the new rules set for the Afgantsy Air Assault Battalion which is how I had wanted to run my Soviet force anyway.  Of course, this means I need more Hinds.

Flames of War is on a semi-hiatus as well, at least with playing.  One player moved, another found a new hobby (that I also share), and another is on a different shift.  Makes scheduling games fairly difficult.  Still, work is proceeding along, just at a slow pace.  I would like to make this the year I FINALLY finish an entire army, and I have fairly high hopes of accomplishing that.  My Soviets are all in the beginning stages of painting, with the infantry almost done, and the tanks moving along.  If I can just keep from adding any more units, I should be fine.  Also, by the time I get it done, maybe the tournament points will return to a higher total so I can run the horde I had planned.

The Heavy Gear Kickstarter is showing some progress.  It was supposed to be delivered last November, but they are being good with the communication on status, and the delays are understandable.  The Living Rulebook (Beta) looks to be pretty solid as well.  I played a game about a year and a half ago that went fairly well.  Since then, I have been content to just continue working on the figures I have, planning lists, and watching videos.


I have some rough ideas of how I want these figures to look.  Basing is pretty much set, I decided to go with the Privateer Press 'lipped' bases, and I am heavily pinning most of the models.  My Southern force has been worked on since I started buying them up in 2013.  The Northern figures I have are coming along much more slowly, I had to re-plan the whole force with the Beta rules.  I still have the Peace River models unopened in their boxes, I wont even get into that until at least one of the other ones is finished.

Recently I decided to get back into X-Wing Miniatures.  There are a few local players, and it seems to be a much better casual play game, so I have been able to play it much more easily.  I am amazed at how much it has changed since I played last.  New faction, several new waves, and a fairly active organized play structure.  A friend and I started a cinematic play campaign using his Rebel Transport, and that has been pretty fun.  I wont go into a lot of detail on that, but felt it was worth mentioning.

I want to try and keep this updated, but the time I spent writing, I am not using to finish projects.  Still, I imagine a few people still read this, so I want to make it worthwhile.  As I can, I will update projects, post photos, and have some resources available for those that are interested.