Finding a package of storage tanks in my box of terrain, I got inspired to make a piece of terrain with them. That got me to thinking when I had seen tanks like that before. I remember working at Transit and having small fenced areas where the city would keep things in big metal tanks. Simple enough, right?

To start I took a hunk of 3mm MDF I had as a scrap (it was originally going to be a base for a building, until I decided not to base them like that). I measured 2mm in from the edge and drew the outside line. Then I took the length and divided it up so that there would be posts at equal spaces. 4mm I think? It will vary based on the piece, just make it so that they are evenly spaced. I also laid down the basic idea of what I wanted to do, with the two open spaces in the front center for the 'entrance' and the two places there would be holes in the fence (right middle, and top left).

Be sure to bevel the edges somehow. I used my Dremel tool with a grinding wheel, though an actual sander would be much better. Its a big difference between the two, as you can see.

I used another scrap to try techniques out on before I used them on the actual piece. Very helpful, I would suggest getting a scrap and doing it to get them down. This way, I found out that just hammering the nails in for the posts was not going to work so well, as well as how to get the right angle to bevel the edge, how to attach the fence, etc.

Using the dremel, I drilled holes at the points marked on the layout. Top down, so if it splintered it would be on the bottom and I could clean it up.


I then took a pack of nails that were about the right height for a 15mm figure, and ground the ends down. Again, fairly simple. I would advise the standard safety gear when working with grinding metal and wood. No blood this time, but a nail did get away from me briefly.


I like for my things to be as precise as I can make them, so I took a larger drill bit and went in to drill out a notch for the head of the nail to rest in. Just takes a steady hand, though I imagine there is an actual tool that would do it in no time. Really wish I hadnt given away my drill press. You just need to make sure the post will stand up straight in it.


I put all the nail posts in and used some Woodland Scenics white glue (I believe this is what they call PVA glue in the UK? Regular US Elmers White glue doesnt work well at all) to keep them in place. I used a hunk of granite to keep the base down so they would glue in the right position. If you need one, most counter-top places that work with granite will hand out samples, and they work great for a variety of shop uses.

While the glue was drying on the posts, I started working on the 'fence'. I went down to ACE hardware and in the screen door repair section they have rolls of different types of mesh. I settled on an aluminum mesh for about $1.50 a foot? For my future projects I will look for the diagonal wire mesh that I am told they sell at car repair shops, because some important lessons were learned with the aluminum mesh. First, you have to be very careful how you cut the stuff so it doesnt twist and deform. A sharp pair of scissors is a must. Then, I had to bend the 'top' and 'ends' of the mesh over so it had a finished look (the bottom I left raw). Again, I measured it up against a post, then a figure, and got the right pattern. In my case, there are 15 'boxes' as well as the rough top and bottom.
Important note - When I purchased the mesh, I picked up some 22g wire to attach it to the nails. This stuff was way too thick and difficult to work with. I found that the strands of aluminum mesh, when pulled out, work great. So, if you cant find any wire small enough, consider picking up a foot of the screen mesh to get all the wire you will need (once you pull it apart). Cutting the mesh up makes a horrible mess, so keep that in mind.


Once the posts were dry I got an idea of how long I needed to make the fence lengths. I needed three sections of it, and I measured over so I could 'distress' the fence in some parts to look damaged. Before I started working on those, I used some CA+ (Zap-a-Gap is what I like) with some zip-kicker (the stuff that makes it harden and thicken quicker) on the bottoms of the nails, then a layer of white glue to fill in the gap. While that dried I cut and fixed up my fence parts.

I brushed a strip of white glue on the post, then laid the mesh against it. I put the corner bend in first using a spare nail, so I wouldnt have to fiddle with it while glue was involved. Taking heavy objects I had nearby, and sticks to insure proper fit, I pushed everything together and let it dry. Note - Push objects next to the post but not on it. The stick on the granite block got some glue on it, and I had to reapply and position it differently when I took the stick off.
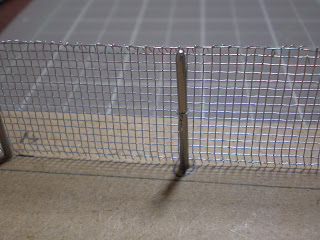
After the glue sets, I took a piece of the mesh wire and attached it physically to the post. Just a pair of tweezers was enough to twist it, then a cut and fold. That way, if the glue later fails, I can just reapply without having to do the whole process again. Looks good too. You could do two ties, top and bottom, but I felt that was overkill.

Next, I distressed the end of the fence. I wanted this section to look like someone drove a vehicle through it, so I bent the posts (something I would suggest doing before you glue them down, I had to be very careful not to break the hole they were put in) and tore up the fence. I just cut it at odd angles, then using those tweezers I bent it all up. Then I repeated the steps for the rest of the fence.
How I modified the other holes, and the rest of the project will be in my next post, once I get pictures of it.
No comments:
Post a Comment