Wednesday, October 19, 2011

Late War German Armor Camo (test2)

After finding a second moisture trap in my parts box and putting it on, I decided to try another test model. I had a looted Sherman from the starter box primed in the Army Painter FOW LW German Armor color (so, Dark Yellow), and I tried a different shade of green (the other one was darker, and more watered down so it didnt go on quite right).


The result is about what my StuG's and Tiger II will look like.  I want to paint the details tonight and apply a wash to make sure I like the way it looks before starting production, but I think I have the hang of it now.

Based on the following photographs:


I think I should make the spots bigger maybe?  Based on these photos anyway.  I had a few others that were more like what I painted, but I cant find them now for some reason. 

Monday, October 17, 2011

Late War German Armor Camo (test)

Got the bug to break out my airbrush yesterday, and after promptly breaking one of them (a bit too rough getting a nozzle off while trying to clear some thick paint out of it) I got some figures done with my other one.  Lesson learned.   Given that I use Iwata's, the part costs about half of what the thing is worth new (its an older airbrush).  No matter, it will sit in a box until I can find someone to buy it or get it fixed.  It is a .2mm nozzle, so probably more precise than I need right now anyway.

Following that, I took a few models out that are easy to clean and tried to get a handle on how to paint them.  This is what I came out with:


My first attempt. I started with thin lines in a 'squiggle' pattern, which I saw in several pictures, but I really didnt like it. So, I just painted over it with thicker patterns to get a hang for what that might look like. Not good, but helped me with these:


These were done using patches of green and brown over the base of dark yellow, like how I had seen some StuG's and Panzer IV's painted up.  Not the overlapping camo that seems to be more modern (think of the older US Woodland BDU's), but just patches of color.  I think it looks... ok?  Not entirely sure thats what I want to go with, but if I can find pictures of tanks painted that way I will roll with it.  Considered painting both of these vehicles up with the details and leaving the body with the camo, but probably wont (I have not found anything that mentions the Germans applied camo to their trucks/tractors).

Here are pictures of what I am trying to accomplish:


The first is a KT painted up by (I guess) Battlefront, the folks that make Flames of War.  I do not think I can manage such a light dusting of color on my tank.  It gives an amazingly authentic look, but damn.. difficult.  Not entirely what I want them to look like either.

The second is from someone on the FoW forums.  This is more in line with what I want to do, but the small patches just dont look quite right.

The third is an actual King Tiger in a French museum.  This is more along the lines of what I was thinking, but I want to make sure that the two-tone camo (base and one color) is ok for the theater I am painting for (the Ardennes Offensive, or the Battle of the Bulge). 

Opinions?

Saturday, October 15, 2011

Tomorrow's War Setting

Put my order in for a copy of TW (The Book Depository has good prices and free shipping if you cant get it at the LGS.  If they dont sell it, check to see if you can get them to stock it!) and it has gotten me to thinking about what sort of setting I want to use.  I am looking forward to reading the one presented in the game, but there are just so many different sci-fi settings that I have enjoyed over the years that picking one to play in just seems... difficult.

In case you have not read about it yet, there are several good reviews out there.  Chuck Platt did a pretty good one, click his name to read it. 

First, you have Battletech.  This was the first game I got into, and my favorite for many years.  I still enjoy it, but its just so slow to play a game, and it doesnt allow for useful infantry combat, tank combat, or battle armor.  Seems like a no-brainer, right?  I can run those scenarios now with TW.  Problems here are that part of what I like about it, the depth and detail, works against it.  The figures are all impossible to get.  I have 30+ of the small 6mm (?) elementals, as well as a bag of 6mm infantry.  Problem is, I dont have anything else at that scale.  Consider trading for some Epic 40k figures, which are pretty close, but lack terrain.  Would prefer not to remake all of my stuff.  Then, I have a single point (5 models) worth of Elementals, but they are in 20mm scale (best guess).  My choices are mostly left for getting generic sci-fi figures and painting them up to loose close to BT, and just using the background story.  Without the battle armor and tanks, its just the fluff.  Good, but not ideal.

Then you have Heavy Gear.  Another series I enjoyed reading about, and they have recently come out with a new set of figures (Gears) that are pretty close to 15mm.  A little small, but they work.  I also like the look of them.  What I dont want is to have to buy books to get info on the setting, and while I enjoy the setting, I am not sold on it.  Its just too obscure.

After this we have Warhammer 40k.  I have a full Space Wolf army, a few loose Imperial Guardsmen, and some Tau.  I lack any terrain, but one thing about 40k being popular is that it is widely available.  Also, while I do enjoy bits of the story, it just isnt one that I am all that inspired to get back into.

We have Firefly/Serenity, specifically the war before the series with the Alliance vs the Independents.  Would make for some great scenarios based on what we know of it and the flashbacks.  Problem is, while its futureistic, its still pretty much the same as modern.  No battlesuits, no mechs, limited armor.  I am REALLY considering going this route, but I want a full on sci-fi experience.  Again, finding good models (the Alliance troops look like the Mobile Infantry from the Starship Troopers movie - the Independent troops wore brown long coats, another one not easy to find) is the problem.

You have the classic Aliens setup with Colonial Marines and Aliens (and Predators).  Good news is that there is already a few different stores that sell look-a-likes for all of those.  I am a fan of the series, and many others are too.  I am thinking I might go this route for intro games, but you get into the lack of armor/mechs and other such.  HOWEVER, I remember reading about an original draft of Alien 3 that had them stuck on a space station run by "space commies" of some sort.  This would lead to some interesting situations with two regular forces.  However, if you stick with canon, its all ignored since they refuted alot of that in Alien: Resurrection.  Still, it gives you access to air units, APC's, etc.

Star Wars is a given.  I already have a box full of minis, and will probably try a game or two using them... but again, I lack any serious interest in it.  Maybe some Clone Wars scenarios.

I am afraid I am going to have to find a way to mesh several together.  I like the idea of regular infantry with guns that are a bit more advanced, but not too different from what we have now.  Elite troops in battle armor.  Some hover tanks, APC's, "Dropships" (futureistic attack/transport helicopters), maybe some aliens that are similar (rather than the mindless bugs, though those would have their place). 

I dont know.. so many options. 

Friday, October 14, 2011

October Update

Well, in the three months since I started this blog I have finished more projects than I think I ever have since I got into the hobby.  I suppose that should account for something.  Americans are done, an Apache has a flight stand, got a pair of Contractors finished, and made some terrain.

I think I should follow through on my idea of making another blog with all of my how-to's and reference material listed, so folks wont need to dig through this to find something.  Not sure of the format though, is the current way I do it working for anyone?  I like to take notes as I am doing it, take pictures as needed, and go through the process like I am explaining to someone that is there watching me.

Lets see whats on the table:
- 15mm Russians (WW3/MW2 theme)
- 15mm Germans (FoW)
- 15mm Insurgents (FoF)
- Space Hulk Marines
- Space Wolves

Now, a few of those are probably less than realistic to get done anytime soon.  My Wolves wont be getting any attention for quite some time, and I doubt my Space Hulk figures will be either.  So that leaves just one big project, the Germans.  Suppose I should break it down into smaller groups.  The Grenadiers, the Pioneers, the Weapon Teams, the StuG's, the Tigers, etc.  With the Infantry Ace's campaign over and my drive kinda driven out (but was replaced by my efforts with Force on Force), I think I am going to want to finish up what I have started so I can check it off my list, and put the rest in foam until I get that interest back.

With Tomorrow's War just around the corner (days, now) I have been thinking about what I am going to do for it.  The primary thought was using my 40k figures to play, which might encourage me to finish up some Wolves and maybe paint up a squad of Imperial Guard I have here.  BUT, all of my terrain is in 15mm, so it might be worth looking into a few squads of 15mm figures.  I was considering picking up the starter box for Heavy Gear, both to give it a try and to get some mech-type units for TW.  There are a few 15mm miniature companies I have also been looking at for a Sci-fi range, though I would like to use what I have.

I dug out my Battletech figures, but the best I could hope for there would be to use them in a 6mm game, which I dont think I want to do.  My elementals are all too small for 15mm, and the large ones I have would do ok at 20mm... both scales I dont play in.  REALLY considering trying to sell/trade the rest of the BT stuff I have.

Still not set on a theme or setting for TW either.  I like the "Aliens" theme with Marines vs Bugs.  I like the "Grimdark Future" that is the 40k universe, but I also want to get away from GW and their figures.  I like the 'mecha' thing that Heavy Gear has going on.  Then there are the haloclix I already have.  Another option was to pick up the Gears of War boardgame and work on something from that Angle.  I got to play it this past weekend and I was really impressed.  The game is decent, but the minis are top notch!  Again, terrain would be difficult, but the 40k stuff usually available should work.  I just want to get something in the works now, so it can be done in a month or so, and then I can start doing demo's of that to find folks to play with.

I guess its one thing at a time.  My current to-do list looks like this:

- 15mm Insurgents
- 15mm Russians
- German Grenadiers
- German Tank Camo tests
- 15mm Early Imperial Romans

I have a few other painting projects to work on if any of those get stale.  Mostly individual figures for friends or commission.  The best way to try and make some extra money with my hobby is to finish projects to show off.  I think I am going to focus on that for awhile, and see what I can do in a month.

Saturday, October 8, 2011

AH-64D Apache Longbow Flightbase

While waiting for miniatures to dry last night, I figured it was a good time to get a flight base put together.  I had seen these for sale here and there, and figured it couldnt be that hard to make my own.

To start with, I had my diecast Apache Longbow, a base, and a cheap mechanics mirror from the local auto part store.


First thing you do it remove the mirror.  Just a pair of pliers at the edge will let you get a grip on the glass and remove it without breaking.  Then you twist it around until the weld fails.  It should leave you with a rod with a flat end.


In the bottom of my diecast model was a hole for the flight stand.  I took that hole and drilled it out a bit further after cutting the flat tip off of the end of the rod in the picture above.  You could also take the flat end and cut/drill out a flat slot for it, but since I had the tools (in this case, a 'dremel' tool) I cut it off and drilled out the hole.


Once you are done with that, you will need to remove the part from the rest of the rod.  Mine was a screw with nut on the other end, easy enough to take apart.  I then glued it into the bottom and allowed it to set.


While waiting, I took the round base and put a nail through the center.  Next time, I would use a bigger nail that fits into the rod better.  Once it is in, you will want to cut it off so that the rod can telescope back down.  It is just needing to be far enough in so you can apply glue so the rod is secured firmly to the base.  Try to make sure it is straight.


Once it dries you can reattach the helicopter if you want.  I wanted to base mine, so I kept going.


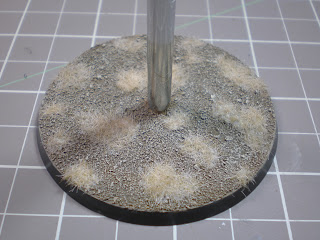
Basing was the same as for the rest of my desert miniatures.  A layer of sand/gravel glued down, a layer of country tan, some Woodland Scenics Earth Undercoat, a drybrush of Bone White, then some "Arid" static grass.  


The end result is a flight base that should blend well with anything else on the table, as well as one that can fly low or high as necessary for the desired effect.  It can also tilt to make for strafing runs or such.


AH-64D Apache Longbow (Wikipedia)

US Army Fireteam 15mm

Finished this project up and now its time to post it.

The intent with painting was to present the ACU digital pattern in 15mm, without actually DOING a digital pattern (impossible at this scale). This involved a bit of drybrushing, and the shade/wash at the end. I am content with it, but I might try playing around with it when I do the next batch if these are still not sitting well. Not that there is a problem, but if I can find a better way, you know?

As for the gear, I had originally considered doing one squad all in coyote/tan, and another all in black, but didnt think that would look right. One squad is coyote, the other is a mix of coyote and black. Want to get the goggle covers in a color other than black next time.

For the bases, I am happy with the desert basing for now. Simple, looks about right, helps them blend but doesnt take the focus away from the figures.

Now, for pictures. Painting details at the bottom.

Full Fireteam + Medic

Fireteam Leader


SAW

M203

Squad Leader


Medic


Rifleman


Painting Guide:
Rebel Miniatures US Army
Primer - Krylon Grey
Skin - Flat Flesh
Uniform Base - Grey Green
Dry Brush - Bone White
Dry Brush (VERY easy DB) - German Camo Beige
Boots - 1/2 Desert Yellow 1/2 Khaki
Guns - Greman Grey
Packs (Coyote) - Rucksack Tan (P3 paint)
Packs (Black) - Black
Goggles - Black
Chin Strap - Reflective Green
Dip/Shade (painted on) - Army Painter Strong Tone

Base:
Glue Gravel on (preferably before you apply primer)
Apply Country Tan (Apple Barrel 'cheap' paints)
Woodland Scenics Earth Undercoat
Drybrush - Bone White
Static Grass - DP9 "Arid"
Black Outline (colors for special figures)

After all of that I apply a layer of Testors Dullcote.


Also, because I got them done at the same time, my two contractors are finished as well:


Wednesday, October 5, 2011

Desert Bases (15mm)

After the Fuel Station project, I decided that I need a better method to do bases for a 'desert' environment.  Thanks to everyone and their positive comments about it, but the thing just really looks off to me.  It has an almost pink coloring when I look at it, depending on the lighting.  The two shades of grass dont have anything close to the look I was going for.

My US Army Fireteam and Contractors are on hold until I can figure out how to base them (they are all but done, otherwise).  Spent the past day playing around with different techniques, and I THINK I found one I like.

First, you attach the gravel when you base the figure, before priming.  This lets the primer 'seal' the basing gravel on, so no chance of it chipping off later.  Also, using fine gravel, not the mixed stuff I use on historical bases and 25/28mm bases.  I put some of the mix on them and it looked all wrong to me.  So, scraped that off and went with the standard fine stuff.  Unfortunately, its all in plastic bags rather than the original packaging, so I have no idea what the grade/type is.  I should find out.

Anyway, after painting and dip/wash, you coat the base in the cheap Apple Barrel "Country Tan" color.  Then putting a layer of Woodland Scenics "Earth Undercoat" on top of that.  Its thinner than regular paint so you get good coverage out of the bottle.  It fills in the gravel and kinda does a shading on its own.  Following that, a drybrush with an off-white color, Bone White in this case.  Then going to do an odd patch of "Arid" static grass (the dead looking patches from the Fuel Station).

They are on the table drying right now, so tonight I should be able to get the static grass on and take some pictures after sealing them.

Tuesday, October 4, 2011

US Army Fireteam WIP

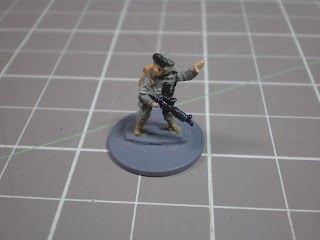
Still playing around with getting ACU to look right in 15mm.  I think I have multicam down, but ACU just doesnt look right to me.  Even still, I thought I should post the progress.  US Army Rifle Squad, plus a Medic.

Two Fireteams, Medic, and Squad Leader

Close up Squad Leader front

Close up Squad Leader rear
 Tomorrow I will give them a 'dip' (more like a wash, I dont like to dip the 15mm figs), finish up the bases, and post another set of pictures.

Sunday, October 2, 2011

Terrain: Fuel Station (2/2)

I decided to try something different with the basing of this project. My usual basing process involves gluing gravel/sand to the base, followed by a layer of Woodland Scenics Earth Undercoat which tends to do the shading on its own. Then static grass.

This time, I went with suggestions on a different style. I am thinking I did not do it quite right, as it did not come out how I was thinking. As a trial basing for 'desert' terrain, it was a fail in my opinion, but looks ok. Tried some new static grass types to get a feel for how they might look, also with mixed results. But, thats why I do them on terrain first, to see how they look.

Now, pictures:


This is the piece following gluing on the sand, and with the base half painted with the new basing.  It was a mix of Folk Art Coffee Bean paint (the cheap $1 paints - this was the only brown I could find at the time), PVA Glue, and water.


Here I have finished painting the base using the mix, followed by what it looks like after the drybrushing.  I used Vallejo Bone White across the entire thing.  You will also notice the difference in the fence.  Took a drybrush of rust to that as well.  It is worth noting that I think I overdid it in a few places, and when I make another fence like this I might try airbrushing the rust on instead because of that.  Not to say that if I was easier with the brushing it wouldnt of produced good results, but I might as well use the thing since I have it, right?

One thing I did notice while painting on the mix was that some places the sand came up.  I considered re-gluing it down, but decided to just cover it up with static grass.  The paint/pva mix should keep that from happening again, but I think I should of watered it down more.


Close up of the fence.  Nothing much of note there, just be careful not to do it too hard, it came unattached from the poles in a few places.  I also gave them a brushing.


Here is the final layout before gluing the tanks down.  Odd patches of Gale Force 9 Static Grass here and there.  Most are "Winter/Dead" grass, but I wanted to see how "Arid" grass would look so I added a few patches.  I put the trail through the middle using some Citadel Devlan Mud.  I love that stuff for just this purpose, it doesnt hurt the shading of what its going on, but makes a clear 'path' that you can see.

My thought for this project is a fuel or liquid storage facility that has been abandoned.  Once fence that looks like someone drove through it (and probably out the front, knocking down the gate that should be there), and another hole that looks man-made (they cut it close to the pole and rolled it up).  After that, it was just left there to rust.  The fence and containers are in poor condition, and other than people walking through it as a shortcut, it is of little interest to anyone.  Possibly due to the liquids stored there, or a spill in the past, grass only grows in odd patches, mostly dead (or weeds).  You could possibly use the old tanks for cover, but its not much of a defensive position.

The end result I am mostly content with.  It was a learning experience at the very least, and let me get some use from odds and ends in my terrain box.  Hopefully writing this will be of some use to someone else.  Now, the finished project.